To see the entire layer palette scroll to the bottom of the screen.
Here is a picture of Arlington Row, a collection of 17th century weavers’ cottages that sits next to the banks of the river Coln in the Gloucestershire Cotswolds. Originally built as a monastic wool store in 1380 before being converted, these cottages are the very epitome of picturesque, especially when you consider that they are not just the most photographed dwellings in the Cotswolds, but the most photographed anything in the Cotswolds.
Henry Ford was so taken with them in fact that whilst on a trip to the Cotswolds, he tried to buy the entire row of houses to ship back to Michigan so that he could include them in Greenfield Village. I on the other hand will just settle for a photograph.
Having driven past these cottages many times I have not actually stopped to photograph them that often, either the light is in the wrong place, (thanks to the surrounding topography they tend to spend quite a bit of time in the shade) or more usually because the village resembles a scene from some kind of automotive purgatory, to say it’s a popular spot on the tourist trail is somewhat of an understatement.
But the good thing about tourists is that they do like a good lay in, meaning this early in the morning it was pretty deserted, so I thought I’d stop and get a picture of the cottages in the mist, you don’t see many pictures of them in the mist so I wanted to get something a bit different. But as you can see from the image below, that came straight off the camera, they are pretty indistinct and slightly lost in the haze.
| The original image |
Obviously with colour images there is that extra parameter to deal with i.e. the colour, that can turn a picture into a mess, make it unrealistic, or any number of things when pushing the processing, by getting rid of that factor it freed up the limits of what was possible.
First thing to do was to crop the image from the top, there is too much of the bright, white sky in the frame and it can afford to lose some of that.
| With some of the sky trimmed away for starters |
| Just the upper half of the image has been affected. Too see the entire Layers palette scroll to the bottom of the screen |
Using two separate adjustment layers is usually the best way to work on a landscape image, as the sky and land will generally require different treatments, and one layer just won’t be able to do the job.
| Now the with the addition of an adjustment layer on the lower half of the image |
For this image I used a couple of plugins from Topaz which I’ve found to be pretty handy. First of all I wanted to generate a merged copy of all the layers I’ve created so far, or Stamp Visible, so using the Ctrl+Shift+Alt+E (Cmd+Shift+Opt+E) keys I placed a new layer at the top of the stack which combined all the changes I’d made so far. This gave me an image to take into the plugin to work on, and also protects the layers underneath from permanent change. In case I decide further on down the line that I don’t need this step, I can delete it and all the processing I’ve done beforehand is kept safe and sound.
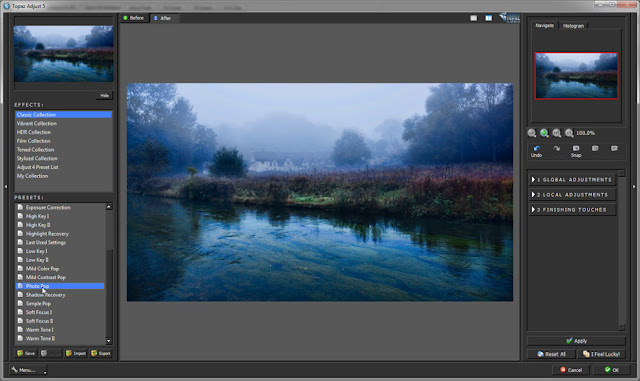
Looking under the filter menu reveals the Topaz sub menu, and from that I’m choosing Topaz Adjust, this can be used to give images an HDR look if that floats your boat, among many other things, but it’s also great at quickly giving a bit of pop to an image, in fact I used the Photo Pop preset to do just that. After accepting the changes I returned back Photoshop with an image that’s had its contrast, colour and detail boosted. This can of course be achieved in the Photoshop itself, but it would take a bit longer, and anything that cuts down on processing time, while still giving good results is always a bonus in my book.
 |
| Here is the Topaz Adjust interface |
| The image after the Adjust filter is applied, note the boosting of the inherent blue in the scene which will be dealt with later and is of no concern |
| Pushing the boundaries of what is acceptable somewhat |
| The change is subtle but when I turned the layer on and off i could see it had done the job |
| With the addition of some graduated layers |
Just a quick Hue/Saturation adjustment layer with a desaturation on the cyan and blue sliders did the trick.
| The blue has been very quickly reduced |
I’m not on a retainer or anything from Topaz, I just find them really useful!
 |
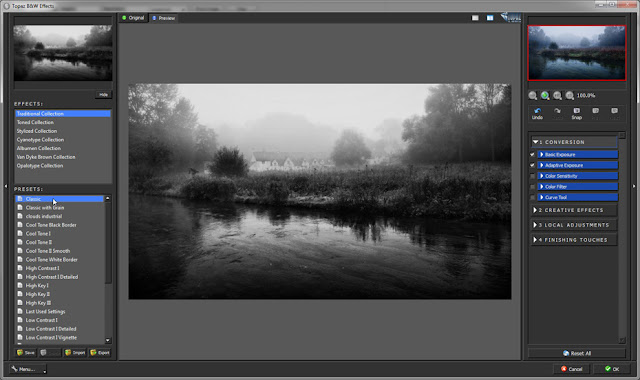
| B&W Effects control screen, with a very similar layout to Adjust |
| After the black and white conversion |
| Contrast and brightness handled with a quick Levels adjustment |
| With the addition of a simple gradient on the left it just brings that side of the image into the frame a bit better |
After making sure the colours were set to the black and white default by pressing D, then pressing X to flip the colours around, so white is the background. I selected the Crop tool by pressing C then ran it from the top left of the image to the bottom right, so the whole canvas was selected, then using the bottom middle handle, pulled it down by a couple of millimetres, then pressed return to accept the change.
What this does is extend the canvas downwards and fill it with white, next I flipped the colours so black was the background and did exactly the same, but pulled it further down this time so there was a thicker band of background colour.
I pressed T to select the Type tool and then added in the title.
| Final Image |
Please click on the layers
image to the left to see a
larger version.
No comments:
Post a Comment