 |
| This picture was not taken in my garden |
Once I had procured the hapless flowers, I picked out the finest example, cruelly tossing away the outcasts and leaving them to make their own way in this pitiless world of ours. And then set up the terrified champion on a table, with my looming lens just millimetres away from its quivering bloom.
I wanted to try my hand at a bit of focus stacking. Often when getting close to an object, even with a dedicated macro lens, the depth of field, or, more importantly, the lack of it can make getting a sharp image from front to back a real challenge, ranging from impossible, all the way to unattainable.
So, you would assume that my dream of getting a sharp macro image of this flower was looking unlikely. And when you consider I don’t even own a macro lens to begin with, you could be mistaken for thinking that this idea was nothing but the hysterical imaginings of a demented buffoon.
But, let me put your mind at ease if I may. Truly I do not own a macro lens, but I do own a set of adaptor rings that can be fitted to my existing lenses, and once these beauties are locked in place, they render any lens capable of macro capabilities.

Once the camera was set up on its tripod and fixed firmly in place, which was obviously a necessity, as the camera and the flower needed to stay as still as possible for the entire process, I was ready to begin the operation.
I used all three rings together to maximise the macro properties, and fitted them between the camera and a 24-105 lens, its front element stationed about 10mm away from the front aperture of the daffodil. It was so close in fact I had to make sure I didn’t knock the flower when adjusting the camera.
As autofocus was no longer available I used the Live View function of the Canon to make sure my manual focusing was as spot on as could be for each shot. I began by taking a shot of the part of the flower nearest the lens, then carefully refocusing further and further, onto the stigma, then down the stile, and into the bowels of the blossom pit itself.
 |
| In Live View the focusing point can be moved around the screen, and you can also zoom in to really makethose fine focusing adjustments |
 |
| Here is an animated GIF produced from the shots I got, showing how the focusing journeyed into the daffodil. If it isn't playing then just click on the image and it may do the trick. |
Once that was done, I opened up the first image in Camera Raw and carried out some basic tone and contrast adjustments to give the image a bit more punch, nothing too fancy mind, just enough to lift it a bit, that’s all we’re looking for, so don’t go overboard, I really won’t tell you again.
Clicking done, and back in Bridge I applied those setting to the rest of the images. Next I went to Tools – Photoshop – Photomerge, with the open images automatically brought in from Bridge, I made sure that ‘Blend Images Together’ was unchecked, we do not want Photoshop interfering at this point anymore that it needs to. I know it means well, but a line has to drawn somewhere.
 |
| Bringing in the images from Bridge to Photoshop via the Photomerge command |
 |
| The Photomerge dialogue box, with Layout selected as Auto and the Blend Images Together unchecked |
Next up it was time to let Photoshop unleash one of its other magnificent devices, namely its Auto Blend Function. So selecting all the layers and going to EDIT – AUTO BLEND LAYERS, I made sure that Stack Images was selected, and the OK button was duly activated.
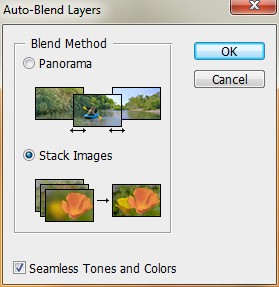 |
| Through some clever mathmatics Photoshop manages to find the sharpest parts of each layer and blend with the other layers. |
 |
| The Photoshop layers with masks applied |
 |
| While it's not what you would call an outstanding example of the genre, the technique has made possible something I could never have achieved otherwise. |
No comments:
Post a Comment